|
SIGNING INTO TINKERCAD
1. Sign INTO TINKERCAD. Click on your Division # and core teachers name. Use the LINK in the help video for more suppot on signing into Tinkercad. 2. Follow the VIDEO tutorial on building the Blinking Light circuit in Tinkercad.
A/ BUILDING A VIRTUAL CIRCUIT |
STUDENT HELP VIDEO LINKS |
virtual programming/code in tinkercad
|
Watch the short video on using the code/programming in Tinkercad.
1/ What happens to the light when you the second built-in code from "HIGH" to "LOW"?
2/ What happens when you change the value from "1000" milliseconds to "250" milliseconds? 3/ How do make the light blink faster and slower? 4/ How do you make the light appear "ON" before it begins to blink? 5/ How do you make the light appear "OFF" before it begins blinking? |
|
B/ Building the circuit
|
1. Use your kit to build the circuit.
2. Watch the video to help. 3. One group member should record the circuit being put together with a laptop or iPAD. (* Make sure you use the correct resistor* - 220 Ohm resistor is BLUE in your kit, NOT brown*) 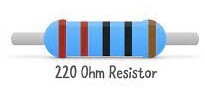
|
BUILDING A BLINKING LIGHT CIRCUIT
ADD a Switch |
C/ Using the Arduino software on the laptop
|
1. Watch the video to learn how to open and use the program on your laptop. Be sure to check the PORT in the program to know that your circuit is connected to the right port for uploading.
2. Use NIMBUS screen recorder to record ONE change you make to the code for the blinking light. 3. Upload that video to drive and then INSERT into your webpage on your Arduino webpage. |
|
ADD SCREEN RECORDING TO WEBSITE PORTFOLIO
DIRECTIONS:
1/ Create a web subpage under your Arduino Page and title it "BLINKING LIGHT".
2/ One group member use NIMBUS screen recorder to record putting the circuit together. You may have to build another circuit to show and explain with the screenrecording.
3/ One group member use NIMBUS screen recorder to record the programming component of the circuit. Use the screen recording to show the answers to the question.
4/ The group members need to upload those screen recordings to their website and share with all group members.
PLEASE USE THE HELP VIDEOS above for using nimbus screen recorder and moving video files from laptops to drive and into your google websites called google sites.